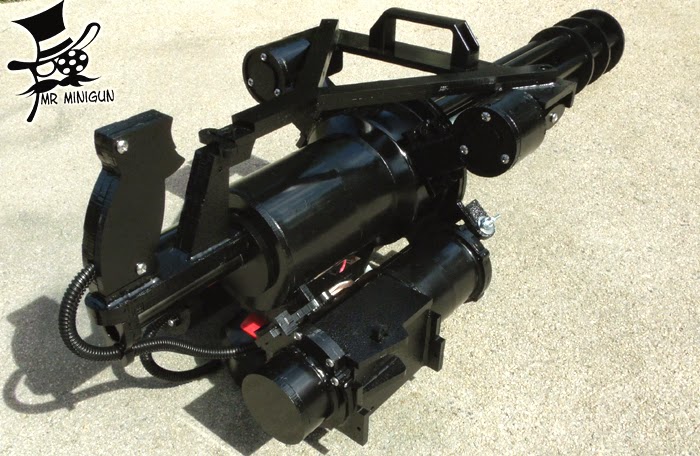
Hey everyone, This is Killbucket, formerly of Air-Sharp.
I now have my site at mrminigun. Sorry, but I no longer offer the CAD
packages. I'm sorry to say, they resulted in few completed costume
M134's, because they took a depth of skill outside of what I'd
originally planned. I also emphasize this point: it was my OLD design
work, belt drive with heavy truck bearings as part of the layout. Not
easy to completely see through.
THE BEST TIPS ON MAKING A MINIGUN DUMMY
You can really, really get mired in the details, and un-neccessarily so.
From insanely detailed to cartoonishly pastiche, a costume minigun WILL
get Love. They are just inherent crowd pleasers. Everybody wants a
picture taken with one. Walking into a room with a minigun really
steals a show in a BIG way.
About the WORST mistake you can make in building YOURSELF a mini is:
throwing money at it. Go cheap, because you WILL make the parts more
than once, and changing your mind mid-stream is a LOT easier if you
aren't "married to" what you have together already. And making
something on a budget just naturally enhances creativity.
Make your objective a project that can be completed. Focus on the
biggest parts, and the most robust construction to ensure an item with
longevity and structural integrity. Skip extraneous detail in your
first few builds (NObody ever makes just ONE mini, it is its own
"sickness", making these. So make plans to get the main parts clear,
then start elaborating on them.) , and make a really simple setup you
can throw around and let people handle, minus explanation or warnings.
I'm sure you've seen countless home made costume miniguns. Most are
throw-together amalgamations, components held in situ by whatever means
were available. There's nothing wrong with this, because miniguns are
confusing jumbles of parts for most observers. As long as the general
out line suffices, it's all very well and good for most of our needs.
Getting down to the nitty-gritty in detail may be possible, but it will
go un-noticed by most observers.
WEIGHT
Keep the overall weight of your chosen components in mind when designing
parts and especially how they attach to each other, and the main
assembly. Hardware seems lightweight, but individual bits really add up
in number, FAST. Try to have single fasteners do multiple tasks, and
eliminate that which does nothing. For an elaborate build, materials
choices can really help. Balsa and PVC foam are great replacements for
smaller, un-stressed details, and are easy to whip up with normal hobby
tools.
OVERALL SIZE
For a given actor or user, the finished size of the unit must be
realistic. We aren't all built like Heavy Weapons Guy. Make it
wieldable. Overall lengths over 3 feet are NOT crowd-friendly, weights
over about 12Lbs are tedious to hold at events, or for retakes in
filming. Long ammo belts look great but limit mobility. Incidentally,
ammo belts of any length that look good are NEVER cheap, period.
BALANCE
Ideally, the minigun's CG should be located such that holding only the
front carry handle allows the gun to hang level or almost level. This
allows an actor or wielder to pivot the weapon naturally, and makes
long-term carry much more comfortable. If you add a Body Harness Ring
like I do, be sure it also balances the unit.
THE PARTS AND COMPONENTS
I made my first fake minigun builds (over 500 units ago) out of foamed
PVC board and plumbing parts, and all the PVC components were cut out
using a coping saw and a bar clamp, out on the kitchen table. I glued
everything together using plumber's cements, and even put airsoft M14's
into a few of them. This was all chronicled in the old Killbuckets
website, which no longer exists. Today, I build exclusively with 6mm
thick ABS sheet from Interstate Plastics, and the minigun parts are
machined by my ShopBot CNC.
THE TRANSMISSION
BELT DRIVES: are simple are relatively easy to make up yourself. You can
use an ordinary RC car motor and a Kenmore vacuum cleaner belt to spin a
barrel pack. An aluminum or steel tube can be used to extend the motor
shaft. It's a bit fiddly to get the belt tension just right, but the
trade-off is something that almost any home cobbler or tinker can
construct. The downside of belt drive is that it side-loads the barrel
pack, and bearings or lubrication become critical. Employing a
conservative Duty Cycle is a must. Running the minigun too long can
overheat parts.
GEAR DRIVES: have other considerations: reliability is paramount. In a
costume minigun, the barrel pack normally sees very little torque
inputs. It spins freely outside of the drive mechanism. However, add
one ham-fisted "friend". Stopping the barrels suddenly or blocking them
while driving the motor puts tremendous loads on gear teeth.
Availability is elusive, even the largest RC Truck gears come up short:
cost-prohibitive and intolerant to errors in installation. I was unable
to purchase suitably large-toothed gears, my calculations specified 2-
module gear teeth, larger than any fullsize truck uses on the starter!
In the end, I designed and now make all of my own CNC cut gears. The
teeth are over a third of an inch high, and are estimated to take
several times the loading that they will ever see.
Some tool catalogs list plastic gears with larger teeth, for some
builder's use, these may be suitable. Grainger's and McMaster Carr are
two sources, but prices are stiff.
BARREL SPEED
The final speed of the barrel pack is also an important design issue.
The current M134D fires at max 4,000 rounds per minute. Divided by six
barrels, that's 666.6 RPM at the most. For safety, 500RPM is the
maximum that I would recommend for a costume or display minigun. Also,
the barrels must easily disconnect from the drive train without damage
if obstructed or accidentally caught in something. Most belt drives
would pass if tested for this feature, but there can be an expected
trade-off in slippage vs safe disengagement.
THE POWER SOURCE
I used to employ ordinary RC Car NiCad battery packs in my creations,
with separate packs and isolated wiring harnesses, if the item also
contained an airsoft setup. This is because barrel drives draw
considerable amperage, and the airsoft gun's firing speed would suffer
otherwise. A cordless drill power pack is ideal. I use the 18V packs
meant for Harbor Freight Drills, because they are universally available.
Spare charged packs are a must for filming unless you have some type
of DC power source. To connect the pack to the minigun, you can run a
cable to the gun inside your ammo belt, or stash it under the gun on a
quick-release dock, like I do.
THE WIRING
On the gun, 16ga wire suffices, but for umbilical or power cables, use
at least 14ga or larger. Trigger switches become a problem.
The tendency and usual design process is to incorporate a video game
joystick handle for it's looks, ergonomics, button layout, and ease of
purchase. However, most are lightly constructed, containing digital
switches that are limited in current capacity.
So a Relay-equipped wiring layout was a must, to allow both circuits to
operate together (or independently if you want to spin the barrels
without "firing"). Mandated use of relays or switch substitution
couteract the ease of adaption to DC motor switching: It's important to
note that the suitable heavy-duty microswitch will not fit inside any
current vidgame controller, and I have tried almost all of them. I use
quality 5-amp rated microswitches mounted in custom-designed handles.
Any airsoft guns get automotive, 30-amp relays. I rarely if ever make
one of these nowadays.
THE BARREL PACK
Making a multi-barrel Gatling Gun pack can drive you CRAZY. First, you
need all six barrel tubes to be of equal length. Some tolerance in
length is allowable, but extreme differences will stand out like a sore
thumb. Also, the tubes need to be of a reasonably rigid material, I've
found plastics to be great for static models that do not spin, but on
costume model miniguns with a powered barrel pack, the curvature of
plastic pipes will be apparent to observers. Metal conduit makes for a
much more solid assembly, and straightness is not an issue.
The separator or spacer discs for a minigun barrel pack will also take
care and planning to execute successfully. My early efforts at cutting
round discs were troublesome, and getting the holes equidistant from the
axis took great care. But it can be done, and enough times to make a
barrel pack (mine contain seven discs, two are just spacer rings) that
can be presentable. Mine are all CNC cut, identical. My best advice is
to make one and then use it as a pattern for the rest.
Assembling the barrel pack straight and true can also be accomplished
with care and planning. I start with just two of the barrel tubes, the
drive gear, and one barrel disc. Clamped up or in my production jig
(sorry no-can-see!), getting the initial two tubes located is key. Once
those are bonded or other wise fixed into place, the rest will align
properly, given matching hole locations in the barrel discs. Liberal
amounts of Loctite Professional Super Glue in slotted assemblies hold
mine together.
The barrel discs themselves need to be axially and radially aligned to
their rotational axis. In other words, when they spin, you don't want
them walking end-to-end, or wobbling side-to-side. This spoils the
visual effect if it's excessive.
A slight amount of misalignment is OK, but the best test is spinning the
pack to check its behavior. Again, alignment jigs or blocks go a long
way in getting parts tightly aligned, as well as taking time in the
process. The barrel pack is THE most "make it or break it" item in the
assembly, from an aesthetic standpoint. Be prepared to make a second
one, to preserve your sanity.
The spacing of the barrel discs themselves is mostly a cosmetic or user
preference. Pictures of real M134 miniguns show one layout, most
costume, movie, or prop miniguns vary. The thick discs in the middle of
the pack double as the bearing point for the front of the pack, so the
center axle must reach at least to that point in the assembled gun.
BUILD COST
This can be silly-expensive, or laughably cheap. I stand behind my
exhortation to GO CHEAP unless you plan to make a row of them:
repeatability changes almost everything. Making ONE mini, you can just
wing it, fudge things and figure it out as you go along. Found objects
being used, literally ensures a UNIQUE and recognizable prop gun.
Planning to make even two, let alone two hundred, minigun movie props
dictates careful choice of all components, and also underlines the need
to repeat operations and finishing in similar fashion. Availability and
cost of individual components can easily derail the process. Ensuring a
supply chain, monitoring quality, and incorporating customer feedback
into product improvements go a long way towards a repeatable success.
SUMMARY
You can do this.